Notes

Do not read codes but patch binary.

Copying instruction area & executing it on the fly

Calling a function means setting one of the registers onto which the instructions for the function are stayed.

Even when you call it at multiple times, the memory you access will never be changed by contrast with the allocation of the footprint of the computation (which is called often stack or heap).

We often pay too much attention to the memory where the actual computation is done because they are always so dynamic that you need to keep track of all the stuffs which had been done, which is ongoing, and which are going to be performed, especially you allocated something on memory outside of stack area.

But, these dynamic computation; jump, allocation and deallocation, is just governed by another special area which is often called code area, and they are mapped onto somewhere on virtual memory in a same manner that other areas are allocated. The each role that code area and execution area is in charge of seems to be distinct by nature. One is statically telling CPU what is done next and another is engaging on it's embodiment or performance. Of course, since the performance is influenced from running environment which is varying constantly such as external file which will be opened, sets of runtime arguments, or environment variables, the patterns of accessing the memory of code area will get some feedbacks from it which we often call it branching. Nevertheless, it's nature is distinctly split as one is statically recognised by CPU, another is dynamically following it.

Self-modifying code is something which are different from the perspective we saw above. Codes can be constructed on its running time and executed on the spot which makes us think computation as much more colourful and flexible as it was thought.

Today, I will introduce a piece of very concise code which are copied from text area on the fly to wherever you like and executed.

when you write a function,

int f1(){
   return 1;
}

They are translated to binary and sit onto a chunk of memory in a pretty obedient manner. The memory where the binary sits is not user-defined but instead mapped by kernel and kept tracked by libc.so as a chain of dynamic shared objects which is hidden on libc. What you are able to know is just the head of it,

printf("0x%x",&f1);

then, you will see the starting address.

if you want to know what was pasted as binary figure on this function, then you should define another function just under the function(how each functions are aligned depends on compiler..), and examine the data in between.

int f1(){
   return 1;
}

void f2(){}

char* start = &f1;
char* end = &f2;
for(;start != &end;start++)
     printf("0x%x",*start);

When kernel maps these instructions, you are often not allowed to write your arbitrary data to the memory.

*start = 1;

Instead, you can make executable mapping, pasting them and can run on it eventually.

char* ret = (char*) mmap( (void*)0, 4096*1, PROT_READ|PROT_WRITE|PROT_EXEC,
                                              MAP_PRIVATE|MAP_ANONYMOUS|MAP_FIXED, -1, 0);

memcpy(ret, ptr, len_f1);
int (*_f1)() = (int (*)())(ptr);
printf("%d\n",_f1());

I allocated executable memory on the very beginning of virtual memory as libc often allocates program to higher memory.

Of course, you can modify its binary as you love.

This is just the very trivial example of self-modification code but somewhat may blow your mind, that was my intention of this writing.

Entire code snippet is here.


#include <stdio.h>
#include <string.h>
#include <stdlib.h>
#include <sys/mman.h>

// binary(instruction) which are mapped.
// 0x55(push esp)
// 0x48,0x89,0xe5(mov %esp %eip)
// 0xb8,0x01,0x00,0x00,0x00(mov:immidiate assignment to %eax)
// 0x5d(leave)
// 0xc3(ret)
// this binary is mapped on to a mapped memory.
// if you modify any of them, it will change its behavior.
int f1() {
  return 1;
}

// binary(instruction) which are mapped.
// 0x55(push esp)
// 0x48,0x89,0xe5
// 0x89,0x7d,0xfc(first argument handling)
// 0x89,0x75,0xf8,0x8b(second argument handling)
// 0x55(push esp)
// 0xfc,0x8b(add %eax)
// 0x45(pop)
// 0xf8,0x01,0xd0(mov)
// 0x5d(leave)
// 0xc3(ret)
int f2(int a, int b) {
  return a+b;
}

// main has lots of binary.
int main(int argc, char **argv, char **envp) {

  for (;*envp;envp++) {
    if (*envp == "DONE")
      exit(1);
  }

  char* ptr;
  // grab a head address of area where instruction code is packed.
  ptr = (char*)&f1;
  
  // allocate a memory where you can execute and not yet mapped.
  // MAP_FIXED is not necessary according to your OS unless you map
  // ever-mapped & (m)protected area.
  char* ret = (char*) mmap( (void*)0, 4096*1, PROT_READ|PROT_WRITE|PROT_EXEC,
                MAP_PRIVATE|MAP_ANONYMOUS|MAP_FIXED, -1, 0);

  // get the length of codes on the scope of function f1 checking the difference
  // between next function pointer and itself.
  const size_t len_f1 = (void*)&f2 - (void*)&f1;  

  // copy memory which contains instructions of f1,f2,f3, main from allocated by libc.so
  // to the executable memory.
  memcpy(ret, ptr, len_f1);

  // execute f1, notify what is returned.
  int (*_f1)() = (int (*)())(ret);
  printf("%d\n",_f1());

  // let the pointer ahead to proceed to next function.
  ptr += len_f1;

  // main function is also mapped with the rest of function.
  const size_t len_f2 = (void*)&main - (void*)&f2;
  memcpy(ret, ptr, len_f2);

  // allocate a pointer type on a current stack.
  int (*_f2)(int a1, int a2) = (int (*)(int,int))(ret);

  char* tmpr = ptr;
  for(;*tmpr;tmpr++){
    printf("0x%x\n",*tmpr);    
  }

  // print second function.
  printf("%d\n",_f2(1,2));

  // step pointer up again.
  ptr += len_f2;

  // at this time, we use strcpy
  // as there is no following function after main which is not obvious to know
  // when the binary of this function is split(in fact, there are ways to know the end of
  // program header asking libc).  
  strcpy(ret, (char*)&main);
  int (*_main)(int argc, char **argv, char **envp) = (int (*)(int ,char** ,char**))(ptr);

  // prevent the program from being endless loop setting fake environment variable.
  envp[0] = "DONE";
  // execute main function again but not exactly itself
  // as its instruction was copied and mapped to lowest virtual area.
  printf("%d\n",_main(0,argv,envp));
  
}

musl code reading ( 0. 概略編 )

xv6のuserland側を拡張しようと、最近musl(https://www.musl-libc.org/)のsourceを読んでいて、なかなか美しいので、備忘録的に何回かに分けてlogを残しておく。

先ず、musl自体なんだけど、軽量glibcの一種で,特徴として

1.単一のshared libraryになる.

->glibcやbionicだとlibc.soの他に,ld.so,libm.so...に分割され、必要に応じてdlopen()されるが、muslの場合,libc.soに纏めてくれる。   なお、静的linkも可能な様で、その場合は、単一にするメリットもないので、数個生成される.

2.docker向けcontainerのalpine linuxで採用.

->alpine imageのcontainer上でbuildして簡単にhack

3.source code量が少ない.

->buildが速い.

つまりsource code readingには良い教材という意味.

自分は以下の様なcycleでやってる。

  1. sourceのclone

  2. docker run --privileged -v /source_full_path:/root -it alpine /bin/sh  (host側にsourceを残し,container上にbind mount)

  3. apk add gcc make (必要library install)

  4. cd ./root && make (muslをbuild)

  5. /root/lib/libc.so 実行file名(e.g. a.out) (buildしたmuslのlibc.soでprogramをexec)

  6. (libraryまたはprogramをhost側で任意に変更し,4 or 5に戻る)

5の共有libraryを直接実行することにより,defaultのmuslではなく,buildしたmuslで引数で与えたprogramの実行が可能.また、組み込みcommand(e.g. /bin/ls)もmuslを利用しているので、実行fileはそれらでもよし. 共有libraryの直接実行は,通常実行と一部sequenceが異なるが,便利なdebug optionもある(glibcのものよりは少なめ).詳しくは、 /root/lib/libc.so --helpを参照して下さい.

基本,読者が一緒にdebugしてくれながら読むことを想定して書きます.

とはいっても、あまり真面目に連載するつもりはないのだけれど..

libcは、細かいネタの集合と見えがち(sys/..を除いたheaderだけでも117個)なので,入り口の使い方から入るのではなく、 src以下のdir(https://github.com/bminor/musl/tree/master/src)42個(でもまだ多いのだけれど..),或いはsystem callを見出しにして、なんとなくまとめていくつもり.

とりあえずsrc/から書くべしテーマを推察してみる. majorどころだと,

  • ldso/(start up routine , dynamic linkのお話)
  • malloc/(別mallocとの比較/performance分析)
  • thread/(tlsとかthread_attrとかfutexとか)
  • signal/(あまり知られてない諸々細かいこと)
  • ipc/(kernel実装と絡めたお話)

その他だと、今の自分の知識だと、こんなの知ってる!?的な投稿になってしまいがちなのだが、できるだけ統合的に書くつもり. なお、投稿はあくまで自分の備忘録(勉強log)なので、読者の理解に最適化されているかはあまり考えてません.

xv6 code reading(7.channel編)

今回はchannelについてみてみるよ。

このxv6のcommiterの一人がGo言語の作り手であるRusCoxであるように、channelの概念はGo言語のそれとも関連がある。
先ず、channelなんだけど、これはproc構造体に地味に付いている。

struct proc {
  uint sz;                     // Size of process memory (bytes)
  pde_t* pgdir;                // Page table
  char *kstack;                // Bottom of kernel stack for this process
  enum procstate state;        // Process state
  int pid;                     // Process ID
  struct proc *parent;         // Parent process
  struct trapframe *tf;        // Trap frame for current syscall
  struct context *context;     // swtch() here to run process
  void *chan;                  // If non-zero, sleeping on chan
  int killed;                  // If non-zero, have been killed
  struct file *ofile[NOFILE];  // Open files
  struct inode *cwd;           // Current directory
  char name[16];               // Process name (debugging)
};

このchanだけど、使われる関数としては、xv6内では、sleepとwakeup.
sleepはsyscallにあるけどwakeupはない。Goで例えるなら、send(<-x)とreceive(x<-)か。
使われ方としては、先ず, sleep,wakeupは至る所にあって

1. 普通にsyscallで呼ばれる(channelは&ticks)
2. 子processをwaitする(channelは自proc構造体へのpointer)
3. pipeを作る(channelはpipe構造体のallocateされたbyte数)
4. blockdeviceへのlog書き込み(channelはlog構造体へのpointer)
5. その他spinlock以外の方法でlockを取る全ての処理(channelは様々)

xv6ではlockingの仕組みは2つしか用意しておらず、その1つがsleeplockだ。だからsyscallのsleepより汎用的な概念を持ち、
多用されている。したがって、汎用的な概念となっている理由は2つある引数(lockとchannel)の内、channelの多様性によるものだ。
process内でやっていることは以下の通りで単純。

void
sleep(void *chan, struct spinlock *lk)
{
  struct proc *p = myproc();
  
  if(p == 0)
    panic("sleep");

  if(lk == 0)
    panic("sleep without lk");

  if(lk != &ptable.lock){  //DOC: sleeplock0
    acquire(&ptable.lock);  //DOC: sleeplock1
    release(lk);
  }
  // Go to sleep.
  p->chan = chan;
  p->state = SLEEPING;

  sched();

  // Tidy up.
  p->chan = 0;

  // Reacquire original lock.
  if(lk != &ptable.lock){  //DOC: sleeplock2
    release(&ptable.lock);
    acquire(lk);
  }
}

1. 現在processを取得する
2. lockがprocess tableではなかったら、次にprocessのstateを書き換える為に、process tableにもlockをかける
3. channelをprocessにsetする
4. channelをsleep状態に変更する
5. schedulerをpreemptionする

複数のprocessが同時に同一のchannelでsleepする事もできる。但し、一つのprocessが複数のchannelでsleepする事はできない。

schedulerは常に process tableの中を個々のprocessのstateのみをcheckして回っており、基本的にRunnaleなprocessをRunningする為のものだ。その為、sleepされた時点でschedulerがそのprocessをrunningすることはなくなる。

寝てしまったprocessを起こして(Runnable)にして、schedulerにより、Runningされる対象にする関数がwakeupだ。実態は以下のwakeup1にある。

static void
wakeup1(void *chan)
{
  struct proc *p;
  for(p = ptable.proc; p < &ptable.proc[NPROC]; p++)
    if(p->state == SLEEPING && p->chan == chan)
      p->state = RUNNABLE;
}

これを見てわかる通り、複数のprocessが同時に同一のchannelでsleepしている場合、wakeupが呼ばれると、必ずしもFIFOキューの様にならない点に注意.
例えば、process2がsleepした後、process1がsleepした場合、schedulerの都合にもよるが、仮に同一channelを用いている場合、wakeupにより、process1が先に起きる事が生じ得る。これを防ぐ為には、channelとなる構造体の中で,process自体をpointerし直すとか、channel自体を順序付けされるものとして表現してやれば良い。pipeが良い例なので、ここでは、pipeを用いて説明する。

pipeは2つのfile descriptor(kernel内ではfile構造体)を引き受け、1つを書き込み専用、1つを読み込み専用としておく。

*f0)->type = FD_PIPE;
  (*f0)->readable = 1;
  (*f0)->writable = 0;
  (*f0)->pipe = p;
  (*f1)->type = FD_PIPE;
  (*f1)->readable = 0;
  (*f1)->writable = 1;
  (*f1)->pipe = p;

またそれとは別にpipe構造体に書き込み用channel,読み込み用channelというものを設ける。channelは書き込まれる分のbyte数分、channelが生成される。

p->nwrite = 0;
p->nread = 0;

channelは、同時に1つしかアクセスを許さない。
新しく書き込む(writeをsleep状態にする)場合は事前に読み込み中(readがsleep状態)かどうかを確認し、終了したら、読み込み可能(readをwakeup)する。
新しく読みこむ場合は、読み込み中(readをsleep)に設定し、終了したら、再度書き込み可能(writeをwakeup)にする必要がある。

なので書き込み処理では、

for(i = 0; i < n; i++){
    while(p->nwrite == p->nread + PIPESIZE){  //DOC: pipewrite-full
      if(p->readopen == 0 || myproc()->killed){
        release(&p->lock);
        return -1;
      }
      wakeup(&p->nread);
      sleep(&p->nwrite, &p->lock);  //DOC: pipewrite-sleep
    }
    p->data[p->nwrite++ % PIPESIZE] = addr[i];
  }
  wakeup(&p->nread);

上の様に、以前、既に読み込みが行われているかどうかをwakeup(&p->nread)により確認し、
sleep(&p->nwrite, &p->lock)によって、byteのoffsetに対応したchannelに書き込みを行う。
dataを書き込んだら、外側のloopに移動し、実際のdataがpipe構造体の保持するbufferに吐き出され、
これをdataがなくなるまで、channelを生成し続ける。

逆にreadする時は、

int
piperead(struct pipe *p, char *addr, int n)
{
  int i;
  acquire(&p->lock);
  while(p->nread == p->nwrite && p->writeopen){  //DOC: pipe-empty
    if(myproc()->killed){
      release(&p->lock);
      return -1;
    }
    sleep(&p->nread, &p->lock); //DOC: piperead-sleep
  }
  for(i = 0; i < n; i++){  //DOC: piperead-copy
    if(p->nread == p->nwrite)
      break;
    addr[i] = p->data[p->nread++ % PIPESIZE];
  }
  wakeup(&p->nwrite);  //DOC: piperead-wakeup
  release(&p->lock);
  return i;
}

読み込もうとしている全データに対して予め別の読み込み処理が来ない様にlockをかけておき、データを読み終わった後に、上書き可能という意味で、書き込み可能を表すwakeupをchannelに対して送る。

とまあpipeに関してはそんな感じにしておいて、最後に、親子process間でのchannelを介したやりとりに関して。

大抵のsample code見ると次のshellの実装みたく、

if(fork1() == 0)
      runcmd(parsecmd(buf)); eventually call exec
    wait();

上記の様なもの見つけるけど、これによると
forkから返ってきた親processはwakeを経由してsleepに到達してる。で、子供の方はexecされて、終了したらexitで返ってくるっていう流れ。

これを詳しく説明すると、
1. 親processは親process自身のchannel上でsleepしてて
2. それを子供がexitしたら起こしにいく(親のstateをrunnableにする)
3. で、子供は子供自身のstateをunusedにせず(できず)、自分をゾンビとしておく
4. 一方、子から起こされた親process(running中)が再びwaitして、zombieの子供を殺し(stateをunusedにし)
5. 親processはwaitからreturnしますとさ

その時に親がchannel内で寝ないで、子供がexitする前に死んじゃうのがzombie.cのcodeなんだけど、

if(fork() > 0)
    sleep(5);  // Let child exit before parent.
  exit();

これでも、exitの方、上手く書かれてて、

// Pass abandoned children to init.
  for(p = ptable.proc; p < &ptable.proc[NPROC]; p++){
    if(p->parent == curproc){
      p->parent = initproc;
      if(p->state == ZOMBIE)
        wakeup1(initproc);
    }
  }

親がいなかったら、親の祖先を辿っていって、上の方に行くとinitが必ず寝てるので、そいつを起こしてzombieなので殺して
下さいとお願いするんだと。

なるほど上手くできてんね。ただpipeの例とかschedulerの回るoverheadが大きすぎだし、全部userlandでやるというGoの発想は確かに当然。今度Goのruntimeもみてみるか。

xv6 code reading (6.fork編)

forkは処理としては簡単そうに見えるけど、中々奥深い。
先ず、概要として、やっていることはprocess内でprocessを生成すること。
forkは子processだと0,親processだと子pidが 帰るって仕様で、
userlandからみると、1つの処理から2つの別processが返る。
これは考えてみると奇妙だ。どう実現されているのか。

codeを読むと、大まかな処理としては、

1. process tableから空いているprocessを確保

for(p = ptable.proc; p < &ptable.proc[NPROC]; p++)
    if(p->state == UNUSED)
      goto found;

2. 取得したprocessに状態,process idを挿入

p->state = EMBRYO;
  p->pid = nextpid++;

3. kernel内のallocatorから1page(4096byte)確保し、processに確保したlowestのaddressを挿入(kernel stackとする)

if((p->kstack = kalloc()) == 0){
    p->state = UNUSED;
    return 0;
  }

4. process内のtrap frame/context領域を確保,生成したprocess内のeip(program counter)にsystem callから帰る為の一連の処理関数のaddressを挿入

sp = p->kstack + KSTACKSIZE;

  // Leave room for trap frame.
  sp -= sizeof *p->tf;
  p->tf = (struct trapframe*)sp;

  // Set up new context to start executing at forkret,
  // which returns to trapret.
  sp -= 4;
  *(uint*)sp = (uint)trapret;
  sp -= sizeof *p->context;
  p->context = (struct context*)sp;
  memset(p->context, 0, sizeof *p->context);
  p->context->eip = (uint)forkret;

5. 現在(親)processのpageTable,size,attachしているfile,process名,trapframeを子processにそのままcopy.

// Copy process state from proc.
  if((np->pgdir = copyuvm(curproc->pgdir, curproc->sz)) == 0){
    kfree(np->kstack);
    np->kstack = 0;
    np->state = UNUSED;
    return -1;
  }
  np->sz = curproc->sz;
  np->parent = curproc;
  *np->tf = *curproc->tf;

  for(i = 0; i < NOFILE; i++)
    if(curproc->ofile[i])
      np->ofile[i] = filedup(curproc->ofile[i]);
  np->cwd = idup(curproc->cwd);

  safestrcpy(np->name, curproc->name, sizeof(curproc->name));

6. その他、copy以外の特殊処理

  • 生成したprocessをschedulerが見つけられる様にprocess状態をrunnableにする。
  • trapframeのeaxレジスタの値(子processの返り値となる)を0に設定
  • 新しい子のpidをreturn
np->state = RUNNABLE;
np->tf->eax = 0;
pid = np->pid;
return pid;

一番の肝は、kernel内部でproc構造体をallocateしているのではなく、既に規定のアドレスにallocateされているprocess tableの空きentryへのaddressをpointして、そこからalignmentされた構造体に部分的に値を挿入していくということ。

親processの方は、一応値のcopyが終わった時点で、戻ってしまい、新しく挿入されたprocess table内のentryにschedulerがさしかかるとforkからcontext内のeipに設定された関数pointerを辿って、userlandに%eax=0としながらiretで戻るという仕組み。

つまり、状態書き換え(fork)&監視(scheduler)による2つの協力があり、初めてprocess生成できるということ。

通常、このcodeだと親が先に返りそうだけど、親のprocessがreturnする前に子供が返って来ることもざらにあって、timer割り込み契機などで、schedulerが小まめに動いているケースだ。

よくpage tableはcopy on writeとかいうけど、それはuser空間の為のpageのお話で、実際にはforkで子processが返って来るためにはschedulerの対象になる必要がある。そうなると、scheduler内の切り替え対象となるcontextは、そして、それをallocateする為のkernel用page(1page)に関しては、fork時にallocateされていなければならないのだ。

kernel stackはstack領域を使うので、当然低アドレス伸長なのだけれど、trapframe(76byte)/pointer to return(4byte) function/context(20byte).
fork後に再度systemcallが呼ばれると、contextの最後尾(eipの位置)が%ebp扱いとなる。これにより、returnすると,eipに設定されたsystemcall(trapret)が機能して、kernel側からの応答が正しくregisterを介して、user側に届く様になっている.


ちなみに、trapframeってsyscallのためのx86独自のものらしいのだけど、意外に大きい(76byte)。そしてこれは用途を考えてみれば頷けるが、contextで保存するレジスタ

struct context {
  uint edi;
  uint esi;
  uint ebx;
  uint ebp;
  uint eip;
};

と被っている。それもそのはず、contextはkernel内でのschedulingの為に存在し、trapframeはsyscallの為に存在する。schedulerはsyscall(e.g. wait,sleep,exit)を含め,trapを契機に発動するのだけれど、systemcall自体は、scheduling自体は別の仕組みで動いていて両者が保存している値が一致しているという保証などないのだ。

forkに関しては、vforkやclone等面白い拡張があるので、ぜひ拡張してみよう。

xv6 code reading (5.paging)

How CPU works for memory access

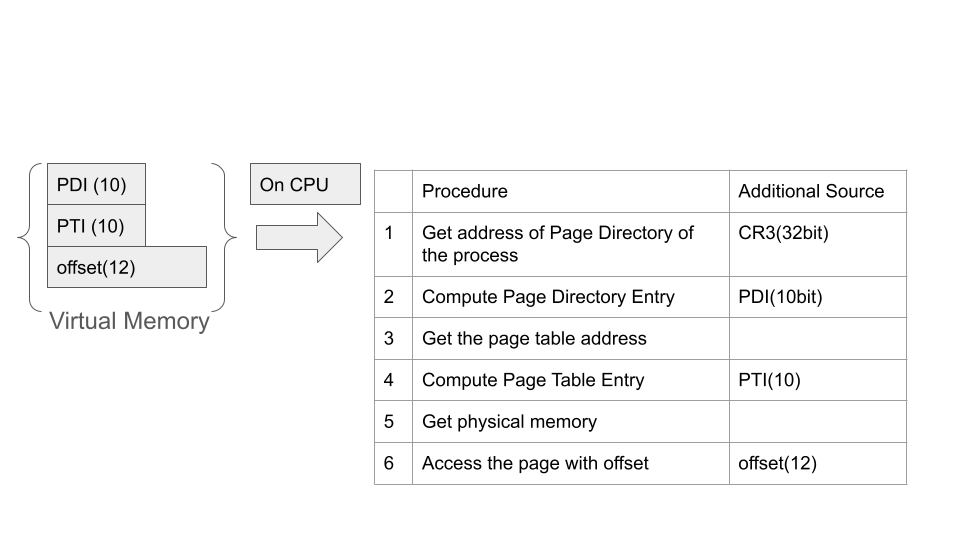
When CPU is ordered to access a value on virtual address, it needs to address a specific page. Accessing same virtual address on two different processes must address mutually distinct physical pages.

Given a memory access instruction is supplied on a CPU, it follows these steps below to read or write data.

f:id:vrodxda:20210314224925p:plain

To accomplish this automatically via CPU, kernel needs to tell CPU the mapping when a process starts. Specifically on each step,

Step1 : Page Directory Preparation, CR3 register setup to Page Directory Step2 : Setup for Page Directory Entry Step3 : Setup for Page Table Step4 : Setup for Page Table Entry

are required.

CR3

On xv6, when a new process is created, control register3 (often abbrebiated as CR3) points to head address of page directory. The procedure is done like below.

// vm.c
void
switchuvm(void)
{
  ....
  ltr(SEG_TSS << 3);
  lcr3(V2P(p->pgdir));  // switch to process's address space
  popcli();
}
// x86.h
static inline void
lcr3(uint val)
{
  asm volatile("movl %0,%%cr3" : : "r" (val));
}

Page Directory

A page directory consists of one or multiple page directory entries. Each page directory entry is 32bit in xv6 and consists of pointer to page table and some additional flags. Absolute address to page table entry is not required as page table entry is always allocated per page unit, which means you can omit last 12bit; 22bit is required. space which is left can be compensated by additional flags where its emptiness, user or kernel, rwx about pages which is managed by the pointed page table.

Page directory can be sparse because it needs to be searched by virtual address. High 10bit of virtual address should represent index of page directory entry. If elf program header specifies highest virtual address (e.g. higest bit is 0b1111111111), the last page directory entry on page directory will be used.

Page Table

You also need to prepare a page table required from a page directory entry. Each page table consists of page table entries and each of them manges one page.

xv6 code reading (4.file system編)

前回VFS(仮想ファイルシステム)について主に書いたので、今回はFileSystem.
xv6はfsとvfsの差が明確に分かれていないが、fsの役割を担っているのは、mkfs.c/bio.c/log.c/fs.c(一部)のあたりか。

先ず、FileSystemの構築だが、先ず、defaultで動かせるコマンド群(lsやcat)のfileなどは、qemuが起動する際に必要なimgの中に
含ませる構成となっている。この時点で既に、superblockの構成単位,defaultfileへのinode付与,root directoryからそのdirectoryにある
fileへのlink等の処理が行われて,binary情報としてimageに含まれている。
xv6のdefaultのsuperblockの構成は以下の様。

全ブロック:1000個(block byte数:512byte)
bootblock:1
superblock:1
logblock:30
inodeblock:26
bitmapblock:1
datablock:残り:1000-59

blockbyte x block数により、全体で512kbyteがdisk容量とされている。
inode blockが26個で、disk上に置くinodeのbyte数が64byte,ゆえに26x512byte / 64 = 208個のinodeが置けるという計算.
inodeに対応したdataBlockの数が941個なので、大体1つのfile(またはdevice/directory)当たり4個位block消費すると最も効率が良い
という計算か。

blockの書き込み/読み込み/消去に関してだが、fs.cからbread(読み出し),bwrite(書き込み),brelse(消去)という関数で持って,device番号/
(super block内における)blockのindexを指定して行われる。

ここで、少し例を出して肝の一つであるcacheの説明をしよう。

lsを例に採る。lsコマンド実行時のuserlandでの処理の流れは以下の通りだ。

ls .を実行
1. sys_openにより(.)directory のfile descriptorをuserlandで取得。
2. file descriptorを元にsys_fstatを実行し、file typeがfile/dir/devのどれかを確認
3. file typeがdirなので,dirのdirectory entryを取得。
4. directory entryに書かれたpath名とinode番号を取得。
5. inode番号にmatchしたfileのメタ情報を取得
5. それらをconsole devに書き込み。

この時,最低何個のblockにアクセスするのだろうか。

1. sys_openでcurrent dirのinode情報にアクセス(metablock内に存在)
2. inode情報がpointerするaddressが指し示すdatablockの中のdirectory entry内を探索
(directory entryの先頭にcurdirの.があるので1block途中の16byteのみseek)
3. matchしたcurrent dirのメタ情報(type)を再度取得(この時cacheに存在するのでdiskへのアクセスなし)
4. current dirのdirectory entry内のblockをseek(最初のblockはcache済み)
5. block内のinode番号からメタ情報へアクセス
6. 4.5をdirectory entryの個数だけ繰り返す。

上から答えは、datablockに対しては最低1回(directory entryの長さが1block(512byte以上)>=32個以上のentry)、metadataに関してはcurrent dirの1回に加え,
そのdirectory内のinodeが別のblockに存在していれば(inodeは1つのblockに8個あるが並んでいるかはmkfsの実装依存),その分だけアクセスが必要。

たかが,lsコマンドだが、多くのsystemcallから構成され、更に別々のblockへのaccessを必要とし、更に、cacheの存在によって、diskへのアクセスが減少するという
ことがわかる。また、ls .を打った直後にls .を叩いた場合、cacheにblockが全て載っているのでblockへのアクセスは全くないはずだ。cache機能をもつbuffer blockはbio.cに書かれているがdefaultで30block分割り当てられている。

xv6のFSではdefaultで、1000個のblockの中で30個がlog blockとして割り当てられている。これは偶然cache用bufferの数と同じである。が、実際の所、必然であり、logによる書き出しは、bufferを活用している。logは、multiprocessからsystemcallが複数呼ばれた際、1度にblockをその都度書き出しせず、logheaderという所に貯めておき、最後のsystemcallが終了した段階で、logheaderの内容をbufferに移し替え、一斉にメモリに書き込む。そのようにすることで、複数processが同一blockの内容を書き換え用とした場合、各processがそのblockへのアクセスでlockされることを防ぐことができる。

xv6 code reading(3.vfs編)

xv6 のsystemcallは次の21種類(因みに、linux2.6で190近くある).

// process start
extern int sys_exec(void);

// operation towards a file(s)
extern int sys_chdir(void);
extern int sys_close(void);
extern int sys_dup(void);
extern int sys_fstat(void);
extern int sys_link(void);
extern int sys_mkdir(void);
extern int sys_mknod(void);
extern int sys_open(void);
extern int sys_pipe(void);
extern int sys_read(void);
extern int sys_unlink(void);
extern int sys_write(void);

// operation towards a process(es)
extern int sys_exit(void);
extern int sys_fork(void);
extern int sys_getpid(void);
extern int sys_kill(void);
extern int sys_sbrk(void);
extern int sys_sleep(void);
extern int sys_wait(void);
extern int sys_uptime(void);

この中で関数の実態に関しては、前回触れたexecを除き、file処理系関連のsyscallの12コはsysfile.cに、process処理関連の8コはsysproc.cに書かれている。

file処理系の12コだが、一言file処理といっても様々あり、以下のように分類しよう。

対象となる構造体 処理 該当するsystemcall
file create open
file read
file mutate pipe,dup
file remove close
inode create mkdir, mknod, open(create mode)
inode read fstat,read
inode mutate write,link,chdir
inode remove unlink

この中でfile構造体がkernel内でdisk上にあるデータを直接管理せず(さらにfile構造体自体はsuperblockのentryに含まれておらず)、processとinodeを繋ぐ血流の役割を果たしていることに注意。
また、inodeをmutateさせると書かれているchdirは、shに直接attachされたinodeというものがcurdirを示す為に存在し、そいつをmutateしているので、他とは少し毛色が異なる。
openは上の表に2度出現しているが、createmodeの時はinode/file構造体を作り、否では、file構造体のみ作る。

struct file {
  enum { FD_NONE, FD_PIPE, FD_INODE } type;
  int ref; // reference count
  char readable;
  char writable;
  struct pipe *pipe;
  struct inode *ip;
  uint off;
};

// in-memory copy of an inode
struct inode {
  uint dev;           // Device number
  uint inum;          // Inode number
  int ref;            // Reference count
  struct sleeplock lock; // protects everything below here
  int valid;          // inode has been read from disk?

  short type;         // copy of disk inode
  short major;
  short minor;
  short nlink;
  uint size;
  uint addrs[NDIRECT+1];
};

上の構造体を見てfileとinodeを比較してみよう。

file inode
役割 1. inodeとprocessを繋ぐ / 2. permissionの管理?(※1) fileと(disk)deviceを繋ぐ
type none/pipe/inode dev/dir/cache
lock有無 x o
管理元object ftable icache
管理元objectのlock有無 o o
link(※2)の有無 x o
ref count up filealloc/filedup ialloc/iget/idup
ref count up(caller) open/dup(<-init,exec) open/fork
ref count down fileclose iput
ref count down(caller) pipe/close/exit close/exit/mklink(※3)


※1. permissionの管理はinodeのlayerでやるべきではないのか。この方法だとdiskにpermission情報が残らない?
※2 linkとは,hardlinkの生成によってupし、rmされることで消去される。mkfs時にdefaultで1となる。
(これはfileからどれだけ参照されているかを表すrefとは異なる/refが0でもlinkがあればinodeは消えない)
※3. mklinkでlink先へのlinkをupしているが代わりにrefがdownするのは???

以下comment

file,inodeともreference countの仕組みを持っているが、
fileはprocessからattachされた時にreference値がup(dup),inodeは fileから参照され、reference値がupする。
通常のobjectに対するref-countのconceptとは異なり、構造体がdeallocateされる訳では無く、管理objectで再割り当て可能object
になるだけ。